How to Create Hello World Page in OAF

How to Create Hello World Page in OAF
This tutorial will teach you the basic steps to create a Hello Word Page in OA Framework.
Please check the below posts to Check Setting JDeveloper and ToolBox
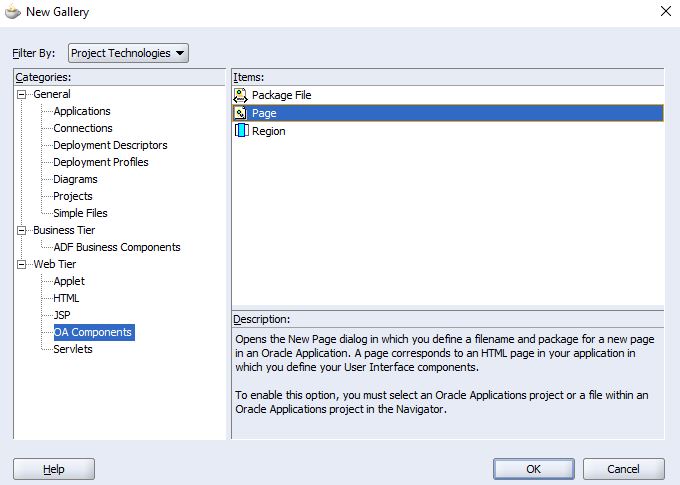
Step 1: Start JDeveloper. From File- > New -> Select Project Configured for Oracle Application
Click on Ok. Project Wizard will open.

Step 2 : Project Wizard will open, Where Project Name,Directory Name will get defaulted Default package name should be provided
For Naming standards please refer Naming Standards in OAF

Step 3: Click on Next and select Database Repository created in the earlier posts.
Refer this for DB Connection creation Initial Setup in JDeveloper for OAF Development

Step 4: Click on Next and select DBC File and Run time user details and click on Finish. Dummy Default Project will get created.
Refer this for DB Connection creation Initial Setup in JDeveloper for OAF Development

Step 5: Create the OA Component Page

JDeveloper creates your top-level page layout region for you automatically when you create your page.
Step 6: Modify the Page Layout (Top-level) Region. Set all the ones with small green box in front of it as shown below

Set the ID property to PageLayoutRN.
Verify that the Region Style property is set to pageLayout.
Verify that the Form property is set to True.
Verify that the Auto Footer property is set to True.
Set the Window Title property to <your name>: Hello World Window Title. This becomes the window title for the page.
Set the Title property to <your name>: Hello World Page Header.
Set the AM Definition property to oracle.apps.fnd.framework.server.OAApplicationModule (you will have to type in the value). This is a generic application module supplied by the OA Framework.
Step 7: Create the Second Region (Main Content Region)
Create your second region under the page layout region by selecting the page layout region in the Structure window and choosing New > Region from the context menu.


Replace the default value in the ID property with MainRN.
Set the Region Style property to messageComponentLayout (this provides an indented single- or multiple-column layout for the child items of the region).
Step 8: Create the First Item (Empty Field) Create your first item under the second region (main content region) by selecting the second region in the Structure window and choosing New > messageTextInput from the context menu. This item will take any name as parameter.


Set the ID property to HelloWorld.
Verify that your Item Style property is set to messageTextInput (this style provides a text label and an input field).
Set the Prompt property to Name.
Set the Visual Length to 20.
Set the Data Maximum Length to 50.
Step 9: Create a Container Region for the Go Button
To add a non-message-type bean such as a submitButton to a messageComponentLayout region, you must first add the bean to a messageLayout region.

Step 10: Create the Second Item (Go Button)
Create your Go button item by selecting the messageLayout region, ButtonLayout, in the Structure window and choosing New > Item from the context menu.

Set the following properties for your button item:
Set the value of the ID property to Go.
Set the Item Style property to submitButton.
Set the Attribute Set property to /oracle/apps/fnd/attributesets/Buttons/Go.
Step 11: Save Your Work (Save-All)
Step 12: Run Your Page Using the Run Option
You can try out your page using the Run option on the context menu. If you are using a database other than what you already have in your project settings, you will need to modify the Runtime Connection project settings by selection your project file and choosing Project Properties… from the main menu. Specifically, you must use a combination of Username, Password, (Responsibility) Application Short Name and Responsibility Key that is valid for your database to enable your session to log in.
The output will be like:

Here the Go Button has no functionality. Now to add some functionality to this Button, we need to add a Controller.
Step 13: Add a Controller
Add a controller to display a message when the user clicks on the Go button. Select your second region (MainRN) and choose Set New Controller… from the context menu.

Step 14: Edit Your Controller
When you create a controller .java file will be automatically created and it will contain below 2 methods.

public void processRequest(OAPageContext pageContext, OAWebBean webBean) { }
public void processFormRequest(OAPageContext pageContext, OAWebBean webBean) { }
Now you need to add the below code in the java file to add the required functionality.
Add the following line as the last line of the import section to make the OA Framework OAException routines available:
import oracle.apps.fnd.framework.OAException;
Add the below code in processFormRequest method
if (pageContext.getParameter("Go") != null)
{
String userContent = pageContext.getParameter("HelloName");
String message = "Hello, " + userContent + "!";
throw new OAException(message, OAException.INFORMATION);
}
Step 15: Build Your Controller.Build your controller by selecting Rebuild from the context menu within the code editor window.
Step 16: Test Your Work Using the Run Option
Save your work, and then test it using the Run option. Type something into your field and then click the Go button. You should see the page with an informational message that contains what you typed into the field, as shown:

Congratulations…! You have created your first OA Page.
Post a Comment